AppsFlyer
Getting Started Guide
AppsFlyer supports the following deep linking functionality provided by the AppsFlyer SDK:
-
Deep Linking: Deep linking occurs when the target application is already installed.The configured deep link directs users to a specific in-app location or triggers a specific in-app activity.
-
Deferred Deep Linking: Deferred deep linking occurs when the target application is not installed. The configured deep link directs users to the download page of the target app in a specific app store.Once the user installs and opens the application, the deferred deep link sends users to the target location in the application or completes the target in-app activity.
AppsFlyer OneLink is a unique cross-platform attribution link by AppsFlyer, supporting users jumping to the target app from various platforms (such as email, social media, web pages, QR codes, etc.) and returning the user ID.The business needs to confirm whether the ID returned is an OpenID or device ID, and use the acquired user ID for final data analysis when attributing invited users to the relevant channel.
Step 1: Create an App in the AppsFlyer Console
Create your application according to the AppsFlyer documentation Add an App.
Step 2: Configure OneLink
If you're new to managing OneLink, configure the OneLink template based on the new customer usage guide.For more information, see OneLink Template
-
Enter AppsFlyer OneLink Management.
-
In the upper right corner, click the menu icon and select Add OneLink Template, then record the template ID.

-
In the OneLink settings page, enter the template name, subdomain, and select the previously created application.
Record the entered subdomain.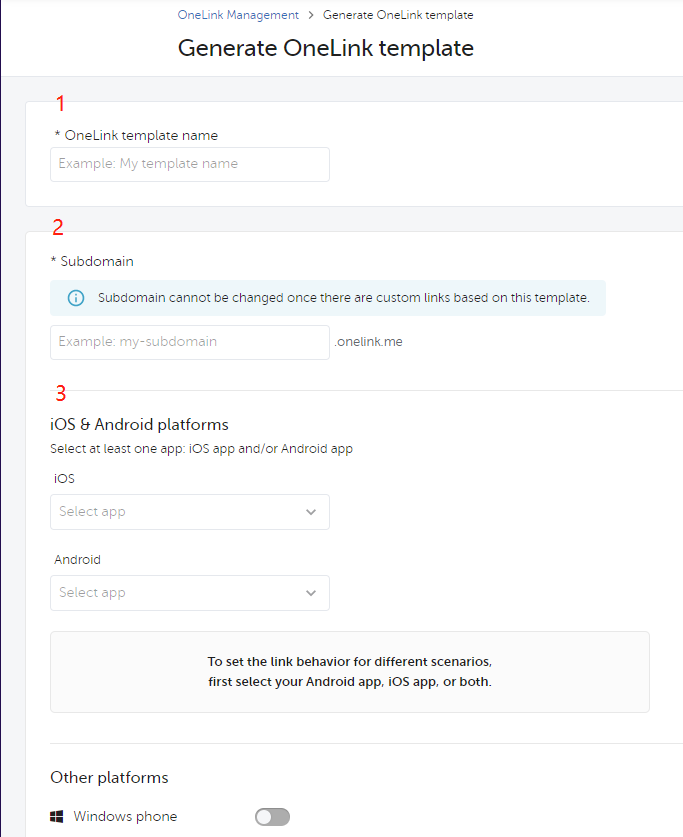
-
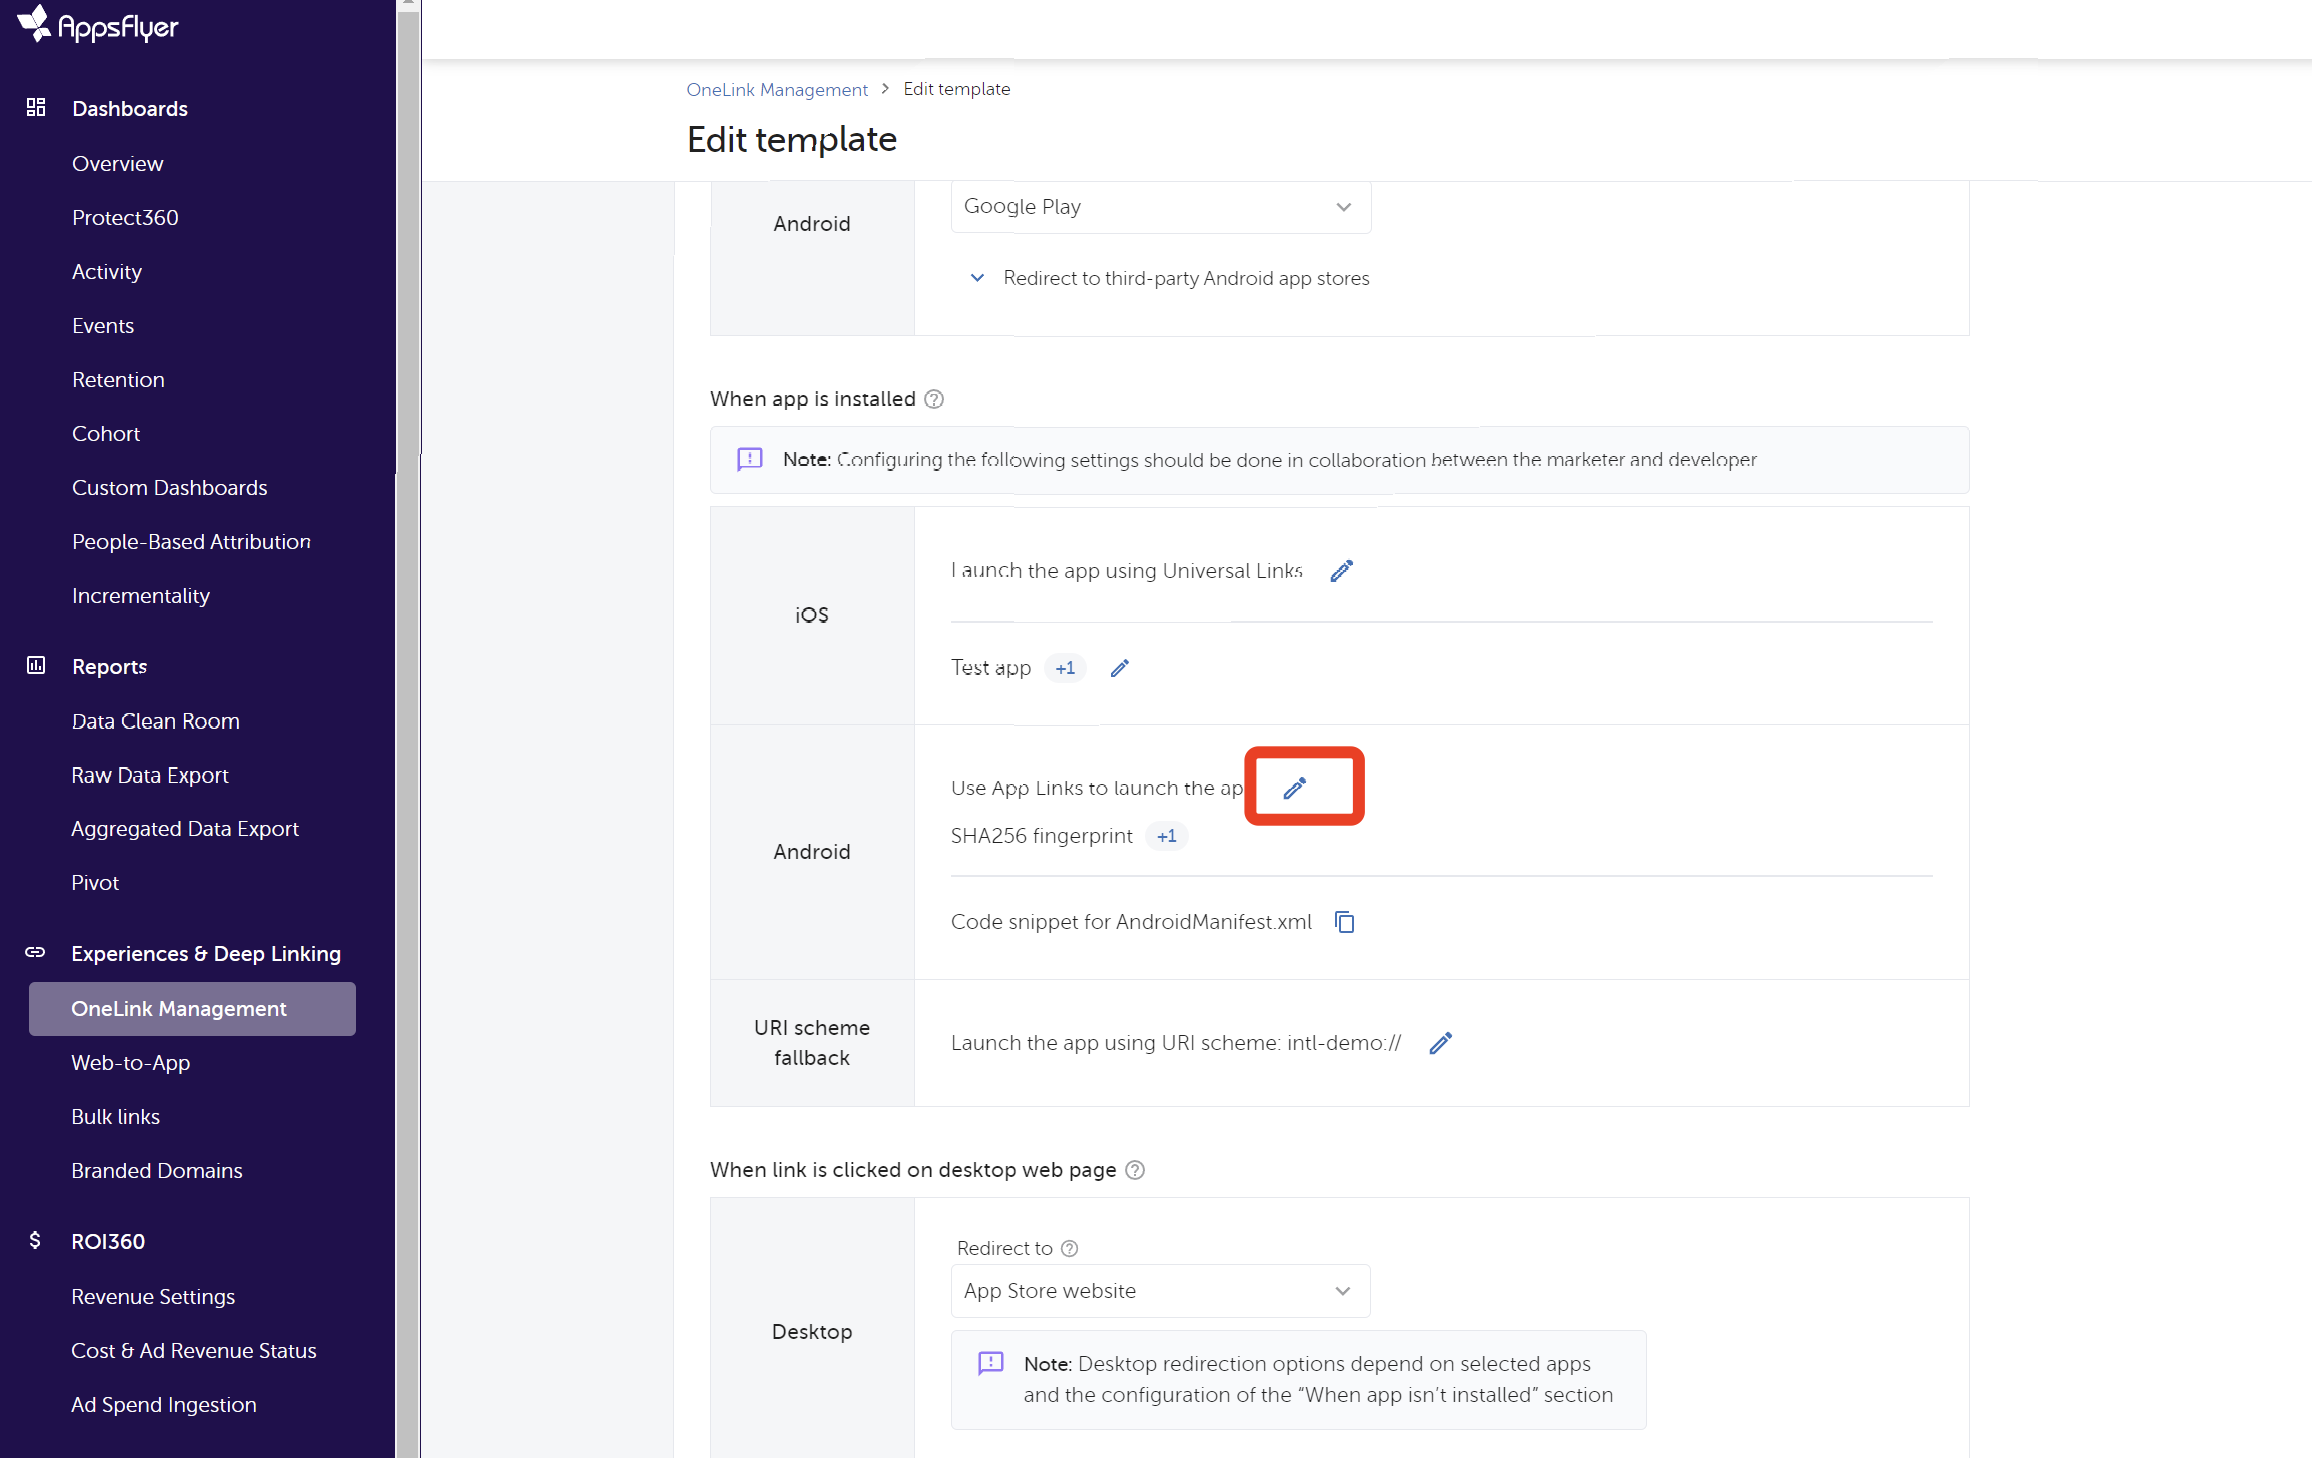
For Android applications, in the When app is installed section, click Use App Links to launch the app to add the SHA-256 from the keystore.For more information, see Android initial setup.
-
Copy and save the
intent-filtercode generated by the AppsFlyer backend.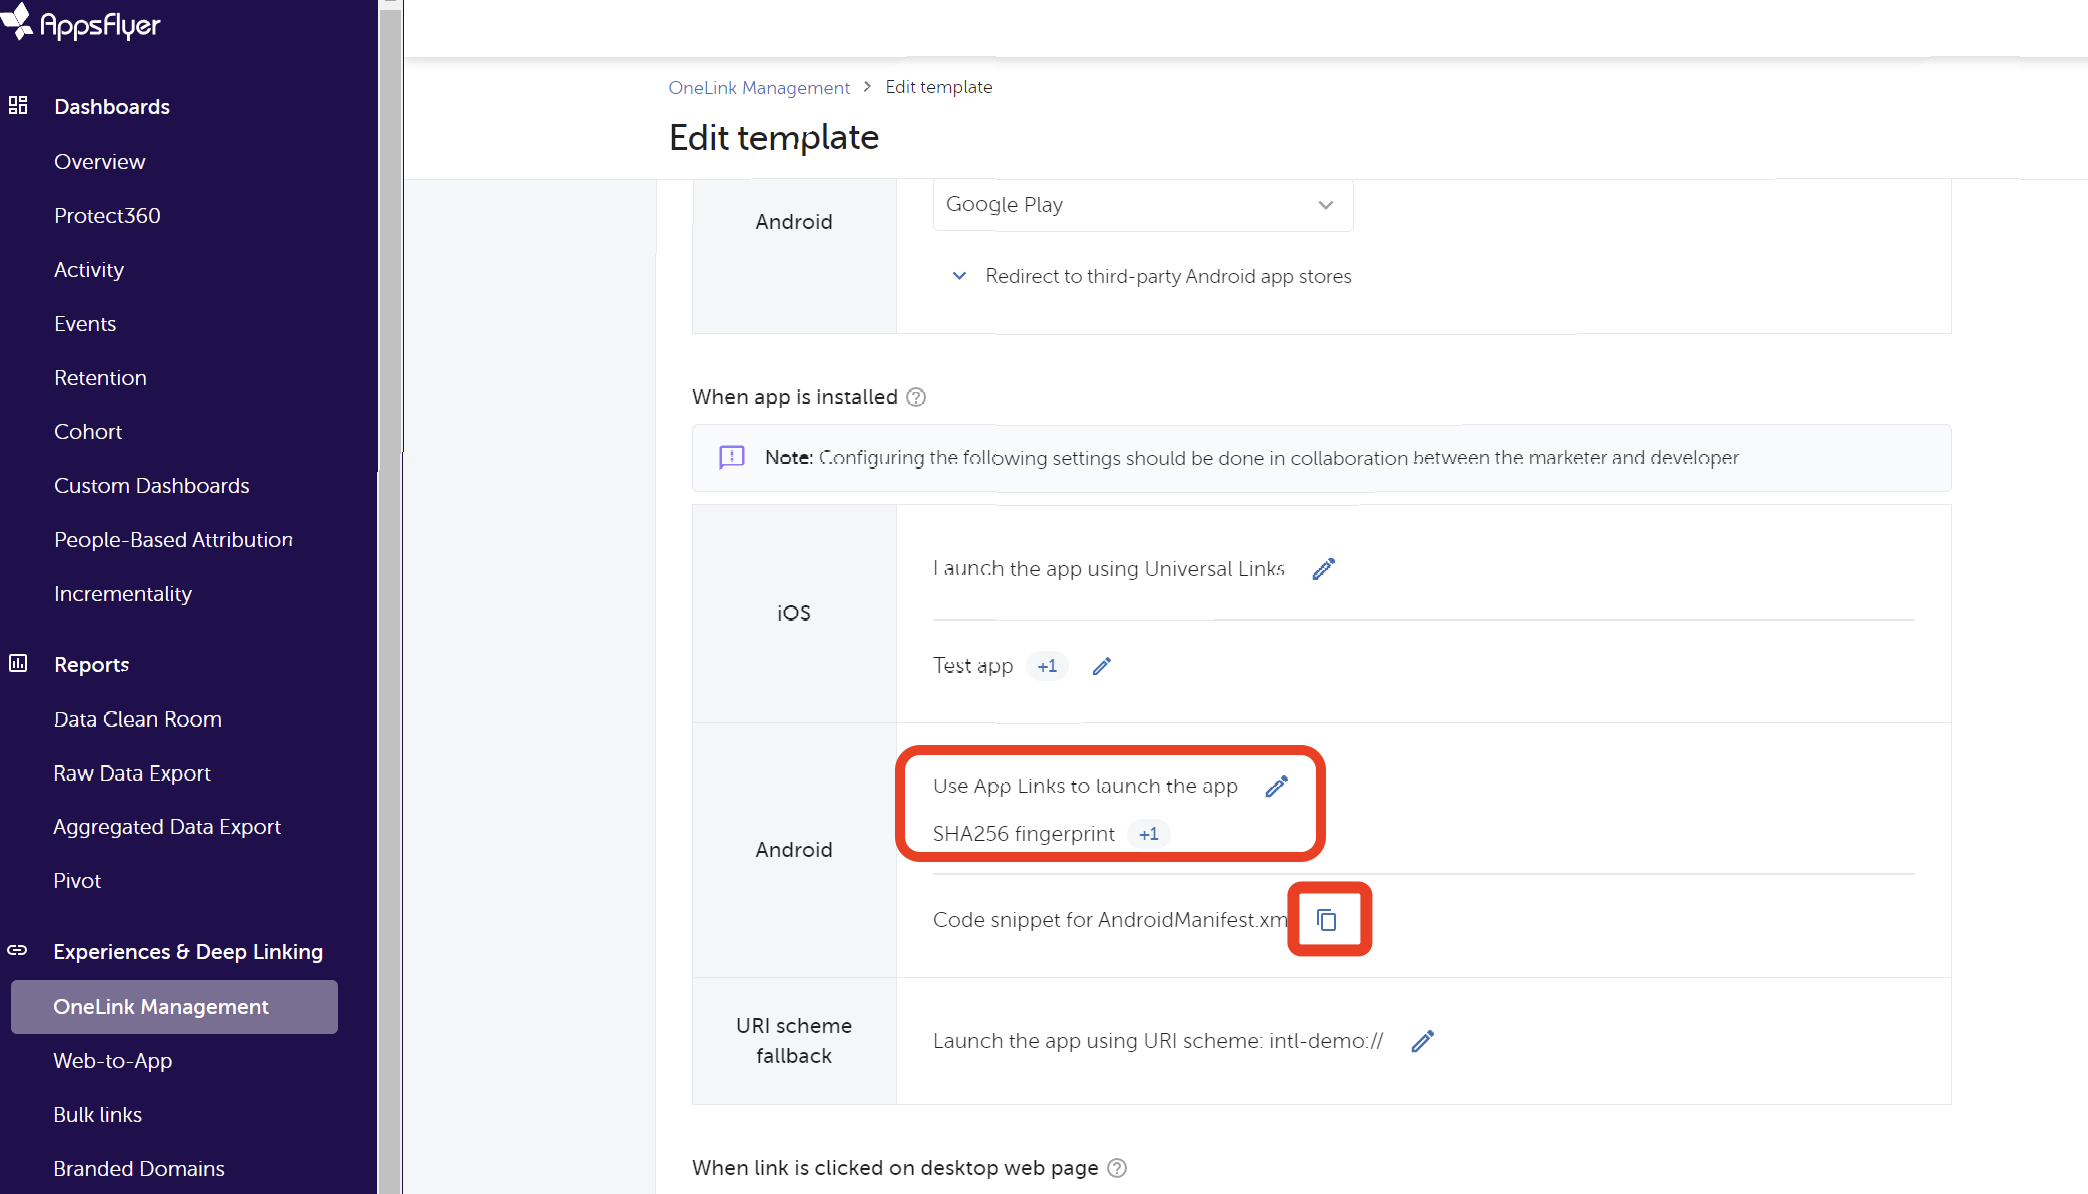
-
Save the OneLink template.
Step 3: Configure Player Network SDK
iOS
- Unity
- Unreal Engine
-
Add the following code under the
[AppsFlyer]section inINTLConfig.iniand replace{OneLink_Template_ID}with the Template ID recorded in Step 2.APPSFLYER_APP_INVITE_ONELINK_ID_IOS = {OneLink_Template_ID} -
Add the subdomain obtained from Step 2 (e.g.,
appslinks:subdomain.onelink.me) to the line inAssets\INTLSDK\Editor\XUPorter\XCodePostProcess.cs.
capManager.AddAssociatedDomains(new string[] { "appslinks:subdomain.onelink.me"});
-
Add the following code under the
[AppsFlyer]section inINTLConfig.iniand replace{OneLink_Template_ID}with the Template ID recorded in Step 2.APPSFLYER_APP_INVITE_ONELINK_ID_IOS = {OneLink_Template_ID} -
In
Config\DefaultEngine.ini, add the subdomain obtained from Step 2 (e.g.,appslinks:subdomain.onelink.me) to theAssociatedDomainslist.
AssociatedDomains=appslinks:subdomain.onelink.me
Android
-
Add the following code below the
[AppsFlyer]section inINTLConfig.ini, and replace{OneLink_Template_ID}with the template ID recorded in Step 2.APPSFLYER_APP_INVITE_ONELINK_ID_ANDROID = {OneLink_Template_ID} -
If the
[Android LifeCycle]section inINTLConfig.inidoes not contain AppsFlyer, add it.LIFECYCLE = WeChat,QQ,Twitter,Adjust,Facebook,Google,Line,VK,Garena,Discord,Dmm,Update,Firebase,WhatsApp,Permission,GooglePGS,AppsFlyer -
Add the Android
intent-filtercode saved in Step 2 under the main Activity node inAndroidManifest.xml.
This code is used to open the game, replace{Subdomain}and{OneLink_Template_ID}according to the actual situation.<activity>
android:name="com.intlgame.unity.MainActivity"
android:configChanges="fontScale|keyboard|keyboardHidden|locale|mcc|mnc|navigation|orientation|screenLayout|screenSize|smallestScreenSize|touchscreen|uiMode"
android:exported="true"
android:label="@string/app_name"
android:launchMode="singleTask">
<intent-filter android:autoVerify="true">
<action android:name="android.intent.action.VIEW" />
<category android:name="android.intent.category.DEFAULT" />
<category android:name="android.intent.category.BROWSABLE" />
<data
android:host="{Subdomain}.onelink.me"
android:pathPrefix="/{OneLink_Template_ID}"
android:scheme="https" />
</intent-filter>
</activity>
For more information, see OneLink Links and User Experience.
Step 4: Call the OneLink Interface
- Set the callback for generating OneLink.
- Unity
- Unreal Engine
INTLAPI.AddExtendResultObserver(OnExtendEvent);//Set callback
INTLExtend.Invoke("AppsFlyer", "generateInviteLinkUrl", paramsJsonString);// paramsJsonString is the information to be transferred to OneLink
    public void OnExtendEvent(INTLExtendResult extendResult)
    {
        if ("generateInviteLinkUrl".Equals(extendResult.ExtendMethodName))//The method to generate OneLink
        {
            if (extendResult.RetCode == 0)//OneLink generated successfully
            {
                string inviteUrl = extendResult.RetMsg;//The generated OneLink, can be shared with other players
                //TODO: share link to other players
            }
            else//OneLink generation failed
            {
                //TODO: handle OneLink Failed result
            }
        }
    }
- Callback class inherits from
IINTLPluginObserverclass - Callback classes implement methods of the
IINTLPluginObserverclass as needed
FINTLExtendEvent extendEvent;
extendEvent.AddUObject(this, &UFriendWindow::OnExtendResult_Implementation);
UINTLSDKAPI::ExtendInvoke(EINTLLoginChannel::kChannelAppsFlyer,TEXT("generateInviteLinkUrl"), paramsJsonString);// paramsJsonString is the information to be sent to OneLink

void UFriendWindow::OnExtendResult_Implementation(FINTLExtendResult ret) {
	if (ret.ExtendMethodName.Equals(TEXT("generateInviteLinkUrl")))
	{
		if (ret.RetCode == 0)//OneLink generated successfully
		{
			FString inviteURL = ret.RetMsg;//The generated OneLink can be shared with other players
			//TODO: share link to other players
		}
	}
}
- Set the callback for the result after the user clicks the shared link and generates OneLink.
- Unity
- Unreal Engine
Generating OneLink and clicking OneLink share the same callback, distinguished by the parameters of INTLExtendResult in the callback.
    INTLAPI.AddExtendResultObserver(OnExtendEvent);//Set callback
    public void OnExtendEvent(INTLExtendResult extendResult)
    {
        if ("OnOneLinkResult".Equals(extendResult.ExtendMethodName))//OneLink click callback
        {
            if (extendResult.RetCode == 0)//OneLink click callback successful
            {
                string jsonParameter = extendResult.ExtraJson;//The parameters AF returns after clicking OneLink
                //TODO: Handle OneLink Parameter
            }
            else//OneLink click callback failed
            {
                //TODO: handle OneLink Failed result
            }
        }
    }
FINTLExtendEvent extendEvent;
extendEvent.AddUObject(this, &UFriendWindow::OnExtendResult_Implementation);

void UFriendWindow::OnExtendResult_Implementation(FINTLExtendResult ret) {
	if (ret.ExtendMethodName.Equals(TEXT("OnOneLinkResult")))//OneLink click callback
	{
		if (ret.RetCode == 0)// OneLink click callback successful
		{
			FString jsonParameter = ret.ExtraJson;// The parameters returned by AF after clicking OneLink
			//TODO: Handle OneLink Parameter
		}
		else// OneLink click callback failed
		{
			//TODO: handle OneLink Failed result
		}
	}

}
- Refer to the following code to generate OneLink, and replace the parameters in the code according to actual conditions.
- Unity
- Unreal Engine
 StringBuilder sb = new StringBuilder();
        sb.Append("{");
        sb.Append("\"deep_link_value\":\"abc\"").Append(","); //<TARGET_VIEW>

        sb.Append("\"deep_link_sub1\":\"1234\"").Append(",");//<PROMO_CODE>
        sb.Append("\"deep_link_sub2\":\"1234\"").Append(",");//<REFERRER_ID(openid)>
        sb.Append("\"channel\":\"mobile_share\"").Append(",");//Channel
        sb.Append("\"campaign\":\"summer_sale\"");//Campaign
        //Other parameters, optional
        sb.Append("\"deep_link_sub3\":\"1234\"").Append(",");
        sb.Append("\"deep_link_sub4\":\"1234\"").Append(",");
        sb.Append("\"deep_link_sub5\":\"1234\"").Append(",");
        sb.Append("\"deep_link_sub6\":\"1234\"").Append(",");
        sb.Append("\"deep_link_sub7\":\"1234\"").Append(",");
        sb.Append("\"deep_link_sub8\":\"1234\"").Append(",");

        sb.Append("\"af_sub4\":\"12324\"").Append(",");
        sb.Append("\"af_sub5\":\"dfasdf\"").Append(",");

        sb.Append("}");
        String paramsJsonString = sb.ToString();
        INTLExtend.Invoke("AppsFlyer", "generateInviteLinkUrl", paramsJsonString);
        FString ParamsJsonString = TEXT("");
        const TSharedRef<TJsonWriter<>> JsonWriter = TJsonWriterFactory<>::Create(&ParamsJsonString);
        JsonWriter->WriteObjectStart();
        JsonWriter->WriteValue(TEXT("deep_link_value"),TEXT("abc"));

        JsonWriter->WriteValue(TEXT("deep_link_sub1"),TEXT("1234"));
        JsonWriter->WriteValue(TEXT("deep_link_sub2"),TEXT("1234"));

        JsonWriter->WriteValue(TEXT(""),TEXT("1234"));
        JsonWriter->WriteValue(TEXT(""),TEXT("1234"));

        JsonWriter->WriteValue(TEXT("deep_link_sub3"),TEXT("1234"));
        JsonWriter->WriteValue(TEXT("deep_link_sub4"),TEXT("1234"));
        JsonWriter->WriteValue(TEXT("deep_link_sub5"),TEXT("1234"));
        JsonWriter->WriteValue(TEXT("deep_link_sub6"),TEXT("1234"));
        JsonWriter->WriteValue(TEXT("deep_link_sub7"),TEXT("1234"));
        JsonWriter->WriteValue(TEXT("deep_link_sub8"),TEXT("1234"));

        JsonWriter->WriteValue(TEXT("af_sub4"),TEXT("1234"));
        JsonWriter->WriteValue(TEXT("af_sub5"),TEXT("dfasdf"));

        JsonWriter->WriteObjectEnd();
        JsonWriter->Close();

        UINTLSDKAPI::ExtendInvoke(EINTLLoginChannel::kChannelAppsFlyer,TEXT("generateInviteLinkUrl"),
Integration Testing
-
Access the AppsFlyer Console.
-
Click SDK Integration Tests on the left sidebar.
-
Select the application to test and click Run test.

-
On the Run non-organic install test page, select the test device and choose Other.
-
Scan the QR code and install the app.
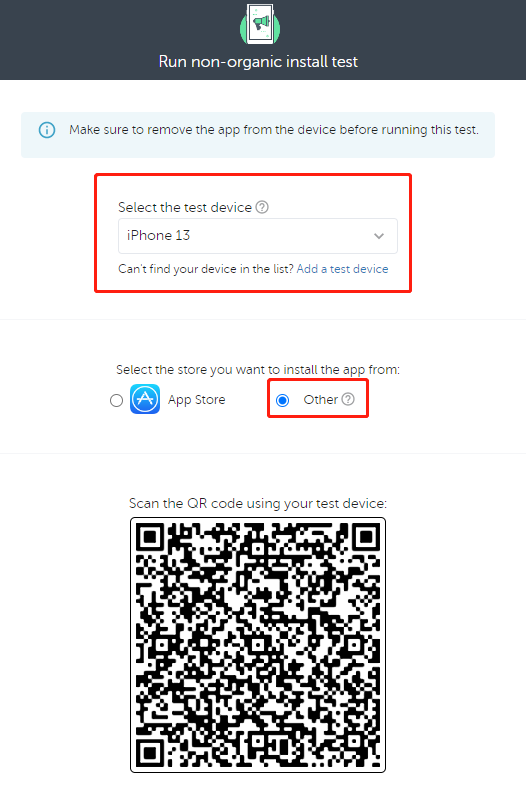
To test activation again, remove the application and restart the test.
Reference Documentation
AppsFlyer Deep Linking and OneLink: Deep linking
