Client Account Integration
Begin with this document and follow the guide step by step to integrate PlayerNetwork SDK!
For further assistance, please contact the Player Network Assistant .
Project Registration & Configuration
For project registration and configuration, Login to the Player Network Console. For details, refer to the Player Network Console Usage Documentation.
Client Integration
Step One: Import PlayerNetwork SDK into the project
- Unreal Engine
- Player Network SDK Integration
Engine Version Support
| SDK Version | Supported UE Versions |
|---|---|
| SDK 1.26 and later versions | UE4.21 ~ UE4.27 & UE5 ~ UE5.5 |
| Versions before SDK 1.26 | UE4.21 ~ UE4.27 & UE5 ~ UE5.4 |
- Copy files into the project
Copy the LevelInfinite and INTLSDK directories to the Plugins directory of the project.Create a Plugins folder if there isn't one in the project.

| Folder | Description |
|---|---|
| LevelInfinite | Player Network engine layer code & related dependency libraries |
| INTLSDK | Player Network SDK engine layer code & related dependency libraries |
| Symbols | Player Network SDK symbol table files, used for stack restoration |
The file extension for LevelInfiniteAssetVersion.lua is LUA, not LUAC, because it contains the LI PASS version number, facilitating business colleagues to know our LI PASS version and for issue diagnosis.
Files in the Symbols directory need to be properly preserved. After the project is launched, troubleshooting online issues may require the symbol table.
-
Add PlayerNetwork SDK dependency in project
Open the project's build file
{projectName}.Build.cs, and add theLevelInfiniteplugin as a private dependency module as shown:public INTLSample(ReadOnlyTargetRules Target) : base(Target)
{
PCHUsage = PCHUsageMode.UseExplicitOrSharedPCHs;
PublicDependencyModuleNames.AddRange(new string[] { "Core", "CoreUObject", "Engine", "InputCore", "HeadMountedDisplay" });
// Add the following code
PrivateDependencyModuleNames.AddRange(new string[] {
"INTLCore",
"INTLFoundation",
"INTLConfig",
"LevelInfinite"
});
} -
Package PNT Lua Resources into the Initial Package
Package PNT Lua resources into the initial package, adding in Packaging/Additional Non-Asset option:
- ../Plugins/LevelInfinite/Content

Business needs to fill in based on the actual storage path of the LevelInfinite folder, e.g., if the actual storage path is ../Plugins/Template/LevelInfinite, you need to add ../Plugins/Template/LevelInfinite/Content here.
- Package PNT uasset Resources into the Initial Package
Package PNT uasset resources into the initial package, adding them in Packaging/Additional Asset option:
/LevelInfinite

Step Two: Configure INTLConfig.ini File
- The INTLConfig.ini file contains configuration items for the LI PASS service and is essential for using the LI PASS service in the project.
- When downloading the SDK, INTLConfig.ini generates the default configuration, and the project can use these configurations to experience PNT-related features.
- If there is a need to modify the INTLConfig.ini configuration items, you can use the project engine's visual configuration editing tool or directly modify the INTLConfig.ini file.
In particular, you need to configure the visible brand name:
BRAND_NAME: xxxxxx
- Unreal Engine
Open the visual configuration editor through the editor toolbar LITools > Config Editor.
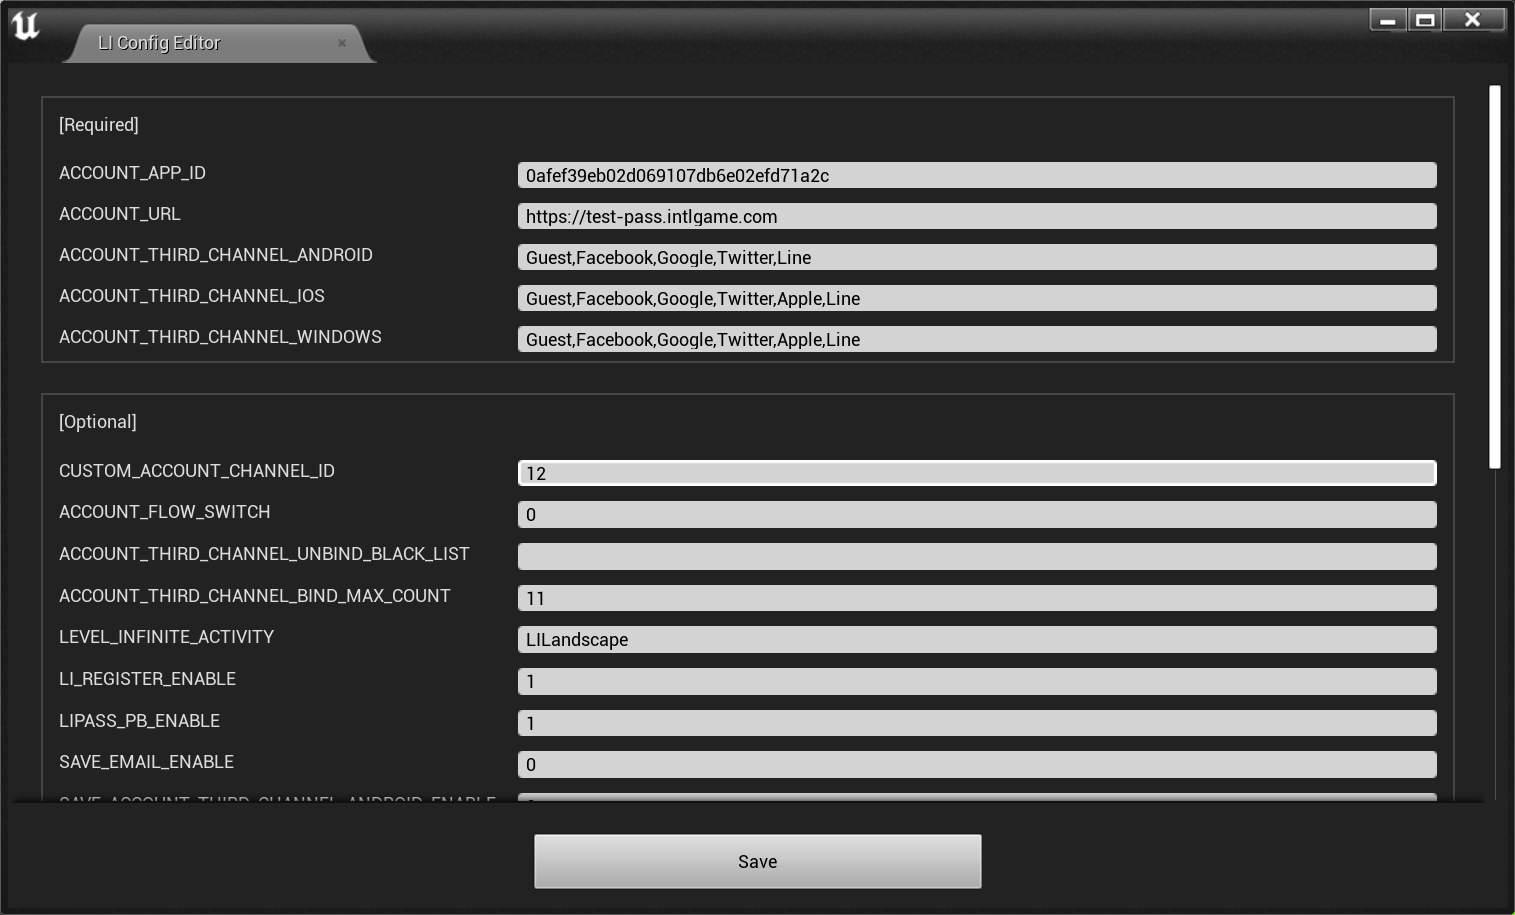
For details on each configuration item, you can select an option in the editor to automatically display a brief description of the option or refer to the SDK INTLConfig.ini Configuration to view a complete list of configuration items.
[Optional] Retrieve player email during third-party channel login
This setting belongs to Third-Party Channel Configuration in the Player Network Console. Web admin have no permission to access; please contact your business team to complete configuration.
To use the quick link feature of the Web linking module, you must first set permission to obtain player email during third-party channel login.
- For compliance, you can apply masking to the returned
emailfor certain sources. If needed, please contact Player Network assistant to enable this. - You can report
base64(sha256(email))in background logs. If needed, please contact Player Network assistant to enable this. - Can be used to verify player information or check whether the link list contains
emailinformation. Please contact Player Network assistant to enable if needed. - Can be used for iOS Firebase's Private Set Membership (PSM) feature. See Firebase iOS Project Configuration.
The following third-party channels support returning the player's email address:
Apple
Apple requires player authorization to obtain player email. If the player denies authorization, the email cannot be obtained. See Login interface passing email and fullName.
-
Use the editing tool to add the
emailpermission to [Dynamic] underAPPLE_LOGIN_PERMISSION. -
Enable the email return feature in the Player Network Console by setting return_email to YES. For details, see Third-Party Channel Configuration.
Enable email return feature in the Player Network Console by setting return_email to YES; for detailed steps, see Third-Party Channel Configuration.
-
Use the editing tool to add
emailpermission to [Dynamic] underFACEBOOK_LOGIN_PERMISSION.IfINTLConfig.inidoes not configureFACEBOOK_LOGIN_PERMISSION, theemailpermission will be automatically included. -
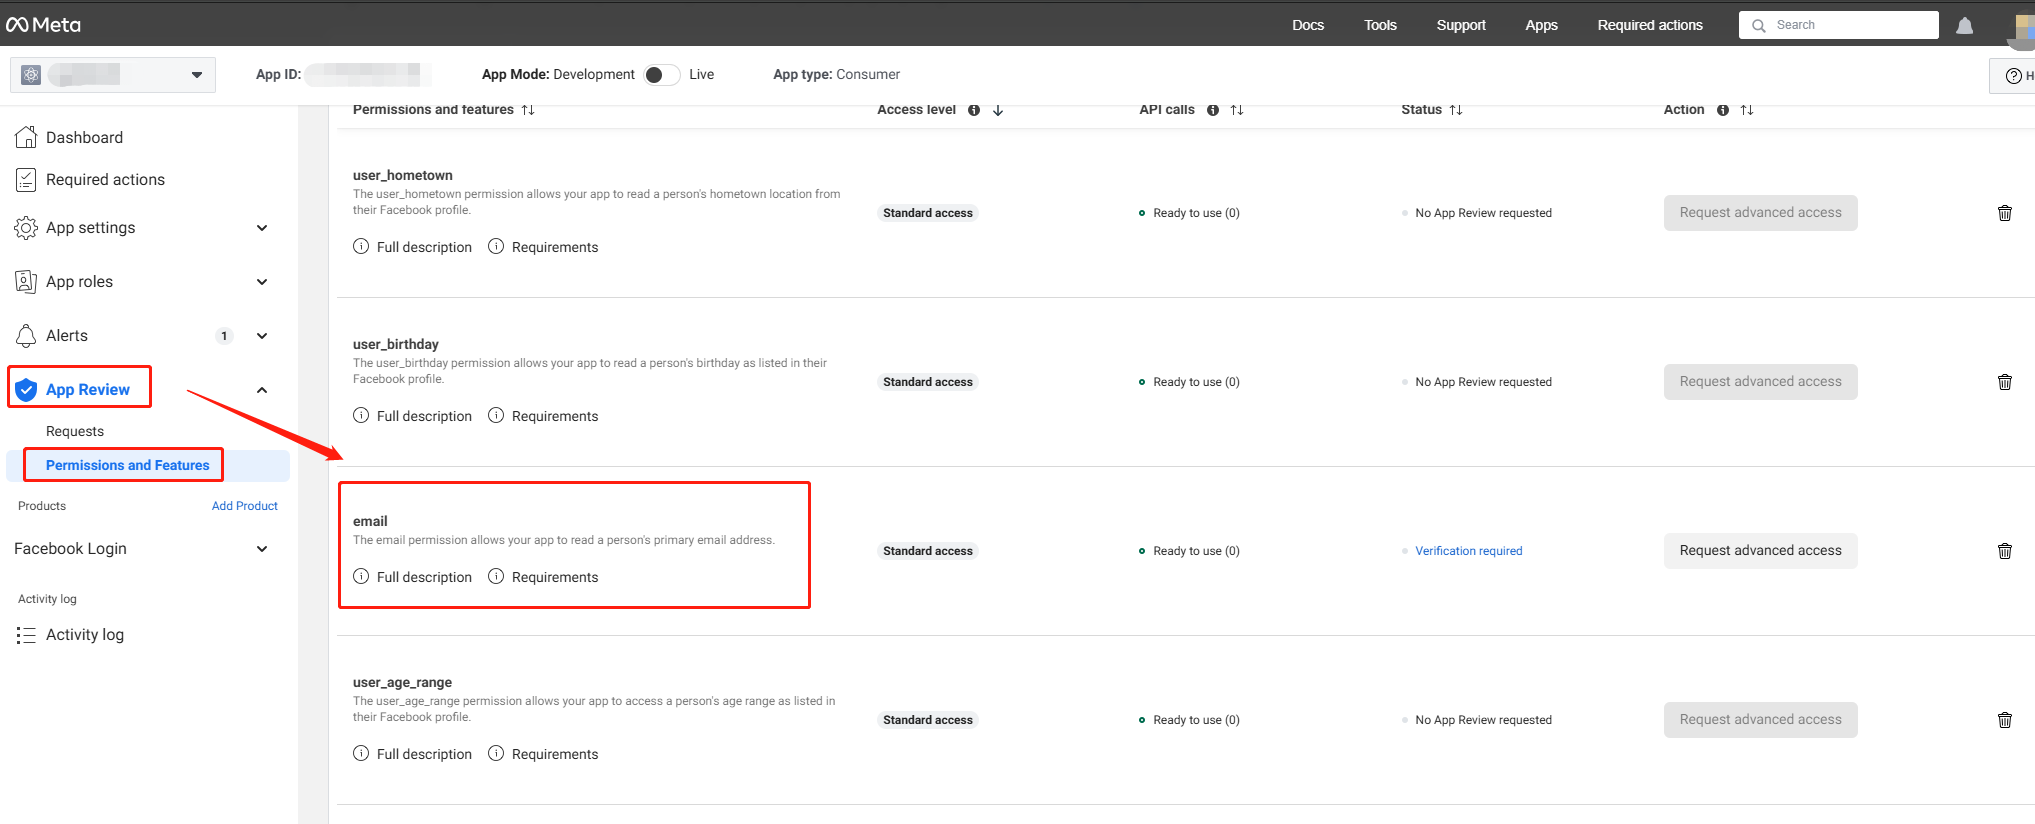
Configure email permission in Meta for Developers.The email permission requires Advanced Access Level for all applications to obtain the player's email.
-
Enable email return feature in the Player Network Console by setting return_email to YES; for detailed steps, see Third-Party Channel Configuration.
-
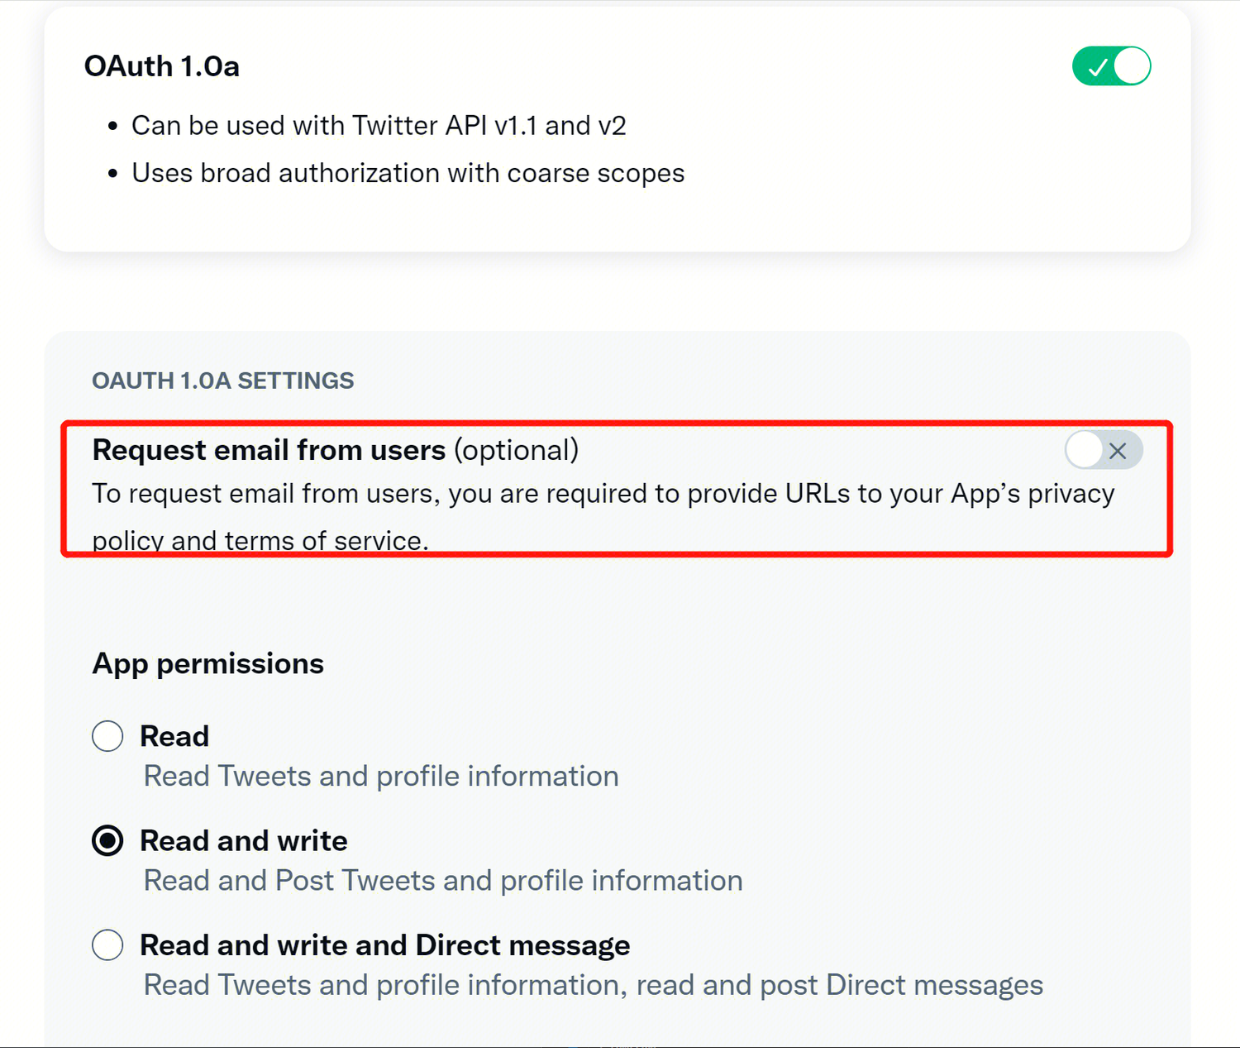
Under User authentication settings on Twitter Developer Platform, check Request email from users.
-
Enable email return feature in the Player Network Console by setting return_email to YES; for detailed steps, see Third-Party Channel Configuration.
Step Three: Initialize PNT
- Unreal Engine
When the project starts, you should call the initialization interfaces provided by PNTSDK INTLAPI.InitSDK and LevelInfinite.InitLIP.
- The initialization process will first check if there are available hot update resources;
- If there are resource updates, it will automatically download and then load the new version;
- After the resource loading is complete, it will trigger the
GN_READYevent in the LI PASS event callback (LIEventObserver), marking the completion of the LI PASS initialization.
#include "INTLSDKAPI.h" // Include the INTL header file

UINTLSDKAPI::Init();
FString Version = FApp::GetBuildVersion();
ULevelInfiniteAPI::InitLIP(GetGameInstance<UGameInstance>(), Version, TEXT("en"));
Step Four: Set the language for PNT interface and emails
- Set the language for the PNT interface using the
SetLanguageinterface. - It is recommended to keep the language set here consistent with the project language;
- The set language type will also apply to emails, such as
verification code emails.
Note that when switching the project language, you need to set the SetLanguage interface again
- Unreal Engine
Interface details: SetLanguage.
ULevelInfiniteAPI::SetLanguage(TEXT("en"));
Step Five: Set UI Root Node
Before using other PNT features, you need to call SetUIRoot to set the root node for all PNT interfaces to ensure correct UI display.
After setting the UI root node, do not destroy the node, or the PNT UI cannot attach and unexpected behavior may occur.
Release the PNT interface through interface button operations; do not force destroy.If Unity controls GC (garbage collection) during scene switching, an empty pointer error may occur.
- Unreal Engine
Interface details: SetUIRoot.
For Unreal Engine, when setting the UI root node, it needs to cover the entire screen.
ULevelInfiniteAPI::SetUIRoot(uiRoot);
- For subsequent console integration steps, refer to Console Account Solution Step Six.
- For subsequent PC Standalone login solution steps, refer to PC Standalone Account Solution Step Six.
- For subsequent PC Store login solution steps, refer to PC Store Account Solution Step Six.
- For subsequent mobile integration steps, refer to Mobile Account Solution Step Six.
Possible Issues
- Unreal Engine
1. Path Error During Cook: LongPackageNameToFilename failed to convert ...
If an error occurs during Cook, LongPackageNameToFilename failed to convert '/LevelInfinite'. Path does not map to any roots, you need to modify Cook's path /LevelInfinite -> /LevelInfinite/, which commonly occurs in versions below UE4.27.
If you encounter problems during integration, please refer to Frequently Asked Questions
Step Six: Add Callback Handling
- Unreal Engine
-
You need to add the AuthResultObserver and LIEventObserver callbacks to handle login component events;
-
The callback data structure is INTLAuthResult, which contains login information and account details, such as OpenID, account link information, and account deletion status.
// Add Callbacks
AuthResultObserver = UINTLSDKAPI::GetAuthResultObserver().AddUObject(this, &ULevelInfiniteWindow::OnAuthResult_Callback);
// Handle AuthResultObserver Callback Result
void ULevelInfiniteWindow::OnAuthResult_Callback(FINTLAuthResult AuthResult)
{
    if(AuthResult.MethodId == (int32)LIEnterGameMethodId::kLILoginEnterGame)
    {
    }
    else if (AuthResult.MethodId == (int32)LIEnterGameMethodId::kLIAutoLoginEnterGame)
    {
    }
}

// Add Callbacks
FDelegateHandle LIEventObserver;
LIEventObserver = ULevelInfiniteAPI::GetEventDelegate().AddUObject(this, &ULevelInfiniteWindow::OnLIEvent_Callback);

// Handle LIEventObserver Callback Result
void ULevelInfiniteWindow::OnLIEvent_Callback(FLIBaseEvent Event)
{
	FString logStr;
    switch(Event.EventType){
	    case ELIEventType::GN_READY:
		{
			break;
		}
    }
}
Step Seven: Complete the PNT Login Process
- Unreal Engine
- Call the
LoginChannelWithLIPassinterface and specify the login channel to perform third-party authorized login;
ULevelInfiniteAPI::LoginChannelWithLIPass(EINTLLoginChannel::kChannelSteam);
- After third-party channel authorization, if the current account is not yet associated with a PNT account and the player is entering the project for the first time, the interface for associating the PNT account will be presented to the user;
- After login is complete, if the current player's compliance process is not yet completed, they will automatically enter the LI PASS compliance process.
Step Eight: Configure Third-Party Channel Information
Using Steam as an example
- Tutorial for Steam Channel Project Application
- Configure the Steam Channel Parameters on the Player Network Console
- steam_appid.txt configuration, refer to Steam Login and Configuration
For more Steam channel integration information, see Steam Channel Integration.
For more Epic channel integration information, see Epic Channel Integration.
Step Nine: Other Configuration
Configure Skip association
- If your project does not want to force users to link their PNT account on first login, you can configure Skip PNT account association in Player Network Console;
- If the skip association PNT account configuration is enabled, the PNT login panel will display a
Skipbutton that players can press to skip the association.
Store Channel Code Configuration
Projects planned to be listed on Steam or Epic store must add the store channel code in INTLConfig.ini:
- Steam
- Epic
[INTL Tools]
WINDOWS_STORE_CHANNEL = 101
[INTL Tools]
WINDOWS_STORE_CHANNEL = 102
